Saturday, August 18, 2012

Garage Door Redux


One of the most dramatic and pragmatic cultural changes in American homes over the last 100 years has been the evolution of the lowly garage. We started with a carriage house left over from horse and buggy days. It was often set behind or off to the side of our property, separated from the primary residence by space and design. Over time, as our vehicles became larger, this newly named building grew as well. When 'Mom' started working outside the home one car became two, and with the growth of the suburbs the separate garage became attached.

Lowly Beginnings
The garage is not lowly anymore. In some neighborhoods the garage has begun to dominate the initial impression of our homes. I've always felt something akin to negativity toward this kind of 'presentation' garage. To celebrate this big box and our ability to fill it easily with our possessions has never been a favorite part of my design mentality. Don't get me wrong, with our now two car families we need safe and secure storage. 


Start Somewhere
Given the opportunity to mask the reality of our storage needs, some new owners are opting to go back in time a little to the sentiment of the 'carriage house', often linking this renewed structure with a breezeway for convenience. What could be a better way to tie these elements of design and neccessity together than carriage doors?


Cutouts for Windows
There are many companies across the nation that are supplying this need. Shadowline, my design/build company, has developed a door set that can be built on site and customized to more truly reflect the style of the home and the owners' taste.


'Plain' Carriage Door with Natural Patina

We use a standard insulated 'blank' door that is purchased locally at a reasonable price. It is made out of wood which allows us to apply various materials over it, and comes with all the hardware neccessary for the functionality we all expect, including remote door openers.

Barn as Garage/Storage
Most of the doors we have constructed use Western Larch (Tamarack). Less expensive and harder than cedar, it has some of the positive weathering properties of cedar, coloring beautifully as it ages.

Colored by Nature

On-site construction allows us to make each door unique to the installation. Some are fairly simple, without crossbucking or windows, while others have the more traditional look of carriage doors of the past.

Monday, August 6, 2012

Rusting Perfectly Good Metal

Back in the day I remember seeing old buildings with metal roofs that were rusting and thinking how cool they looked. There was something about them that reflected an aura of gentle aging, of the graceful passing of time. Today, with a little help from chemical science, we can speed things along and have that 'aged in time' look in an afternoon. Corten was the first 'rusting' metal alloy that I remember and was quickly accepted as the material of choice for guard rails on highways throughout the nation. The logic of the Corten metal is to combine dissimilar metals into an alloy that produces a kind of self sealing finish, a rust that stops rusting.  A stabilized rust. It took a few years but that same technology has moved into the construction mainstream. The relatively high cost of this type of metal has helped to popularize cold rolled steel as a viable 'rusty' alternative. Allowed to weather in nature (or 'rushed' with the use of added corrosive materials) it produces a more organic patina than the very uniform look of Corten type alloys. The natural look of rusted cold rolled steel and it's greater cost effectiveness made our choice easy. Because of our climate (dry) and the wall wainscot installation (dry) we needed to speed Mother Nature along by pre-rusting the raw metal before installing it on the building.

Here comes the 'smarter than' part. You would think that just spreading on some muratic acid or vinegar would produce the desired effect. Wrong. Again, we are in a hurry here, time is money and all that. The process of cold rolling steel is itself an issue. The pressure necessary to produce the product seals the metal surface from the quick action we would hope for. Add to that the small amount of oil that is used to keep the cold rolling process running smoothly and you have another layer of protection against the immediate 'ravages of time' effect we are trying to produce.


New, untreated corrugated steel

In the past I have used a biodegradable but industrial strength soap to hurry along the etching effects we look for on galvanized metal, but with this material it seemed relatively ineffective. I had heard from others that sand was a key to help abrade the surface to receive the corrosive effects of the acid.  First I sprayed the surface with diluted muratic acid, then sprinkled on some sand, and with a medium soft floor broom proceeded to rough up the metal surface. This worked fairly well but I still had to spray on a second coat of acid and do more brushing to get anywhere close to the surface patina I was looking for.  

Prepped with Acid & Sand

I next tried to use salt instead of sand and/or in conjunction with sand to speed things up. This worked fairly well but the early patina produced by this mix was not particularly attractive. Still not satisfied with the effectiveness of my attempts at instant rust, I went against my stubborn maleness and asked somebody who knows. Barry Stromberger of "The Slag Works" has been working in metal and metal patina for most of his not insignificant years. He had the answer, ferric nitrate: "Just mix with water in the correct proportions  and (after the initial roughening of the surface), spray it on and watch it go".


Perfectly Rusted Wainscot


 I love this stuff. If you have properly prepared the surface, with little effort you can  produce a gorgeous and natural looking rust patina that will range in color from a kind of yellow gold (short duration) through a very organic red, all the way to chocolate brown (just let it sit). Once you are satisfied with the rust tone, rinsing with water stops the action, or close enough. The reality of cold rolled steel is that in a wet environment you will have continued rusting. In our exterior wainscot  installation and semi arid climate this should not be a problem. The galvanized corrugated roofing we have used in the past is typically 26 gauge whereas the steel corrugated material is 22 gauge, much heavier to withstand the the reality of its use.


                         This is one time where 'instant gratification' has paid off handsomely.


Saturday, July 21, 2012

Not To See, part 2

In my last blog post I tried to show the value of hidden fasteners in the design and construction of a covered porch. I had gotten as far as showing a completed log post base. It might work best to read this previous post first.

   Ever try to plumb a tapered log post? I promise you will find way too many different readings on your level to be confident of plumb perfect. Mother nature says throw away the level and stand back and use your eyeball. If it looks good it probably is. It would be smart to check that the prescribed measurements for the coming roof structure align with this 'good enough' philosophy.

Big wood, big saw
After plumbing up and bracing off our three log posts, we cut, plane and otherwise prepare the horizontal beams before lifting them into position. Once in place they will allow the roof load to transfer through the rafters and onto our posts.
All good posts deserve good beams
With everything we are doing exposed to view, the scale and proportion of the finished product is very important. We use 6x ( in this case 6x10 and 6x12) solid sawn beams for the horizontal support system instead of the adequate but lighter visual impact of a 4x beam or the less friendly, man made reality of engineered wood (glu-lam beam).
Nick setting a mitered corner.
The joinery in this installation may appear simple to the naked eye but is important to the long term presentation of this celebrated area of outdoor living. In this case we use a hybrid miter joint at the  corners where the beams come together at 90 degrees. This modification will minimize the eventual shrinkage to the inner faces of the adjoining beams. I'll plan to do a future post explaining 'shrinkage' of large scale materials but suffice to say that with this approach we will minimize the negative visual aspect of a standard miter joint opening over time.

Big hammer, big lag
Once the beams are in place over their respective posts we can add another element of our hidden fastener approach. Though this may not fly with some building inspectors we are able to use 16" lag bolts driven through each beam bearing location and into the post beneath. The threaded portion of the lag acts as a kind of 'ring shank' fastener as it penetrates the post end grain. Next comes the ridge post and ridge beam, here again we use a 16" lag from above and 8" Timberlock screws at the ridge post base.

Impact driver makes setting long screws 'No Problemo'
For the rafters we again use Timberlock screws to act as tiedowns from above so as to be hidden from view.
Ridge post with diagonals for strength and beauty
Once the rafters are properly secured we can proceed to the function of standard roofing methods as well as the further visual enhancement of the enclosed pine T&G soffits.

Monday, July 9, 2012

To See Or Not To See

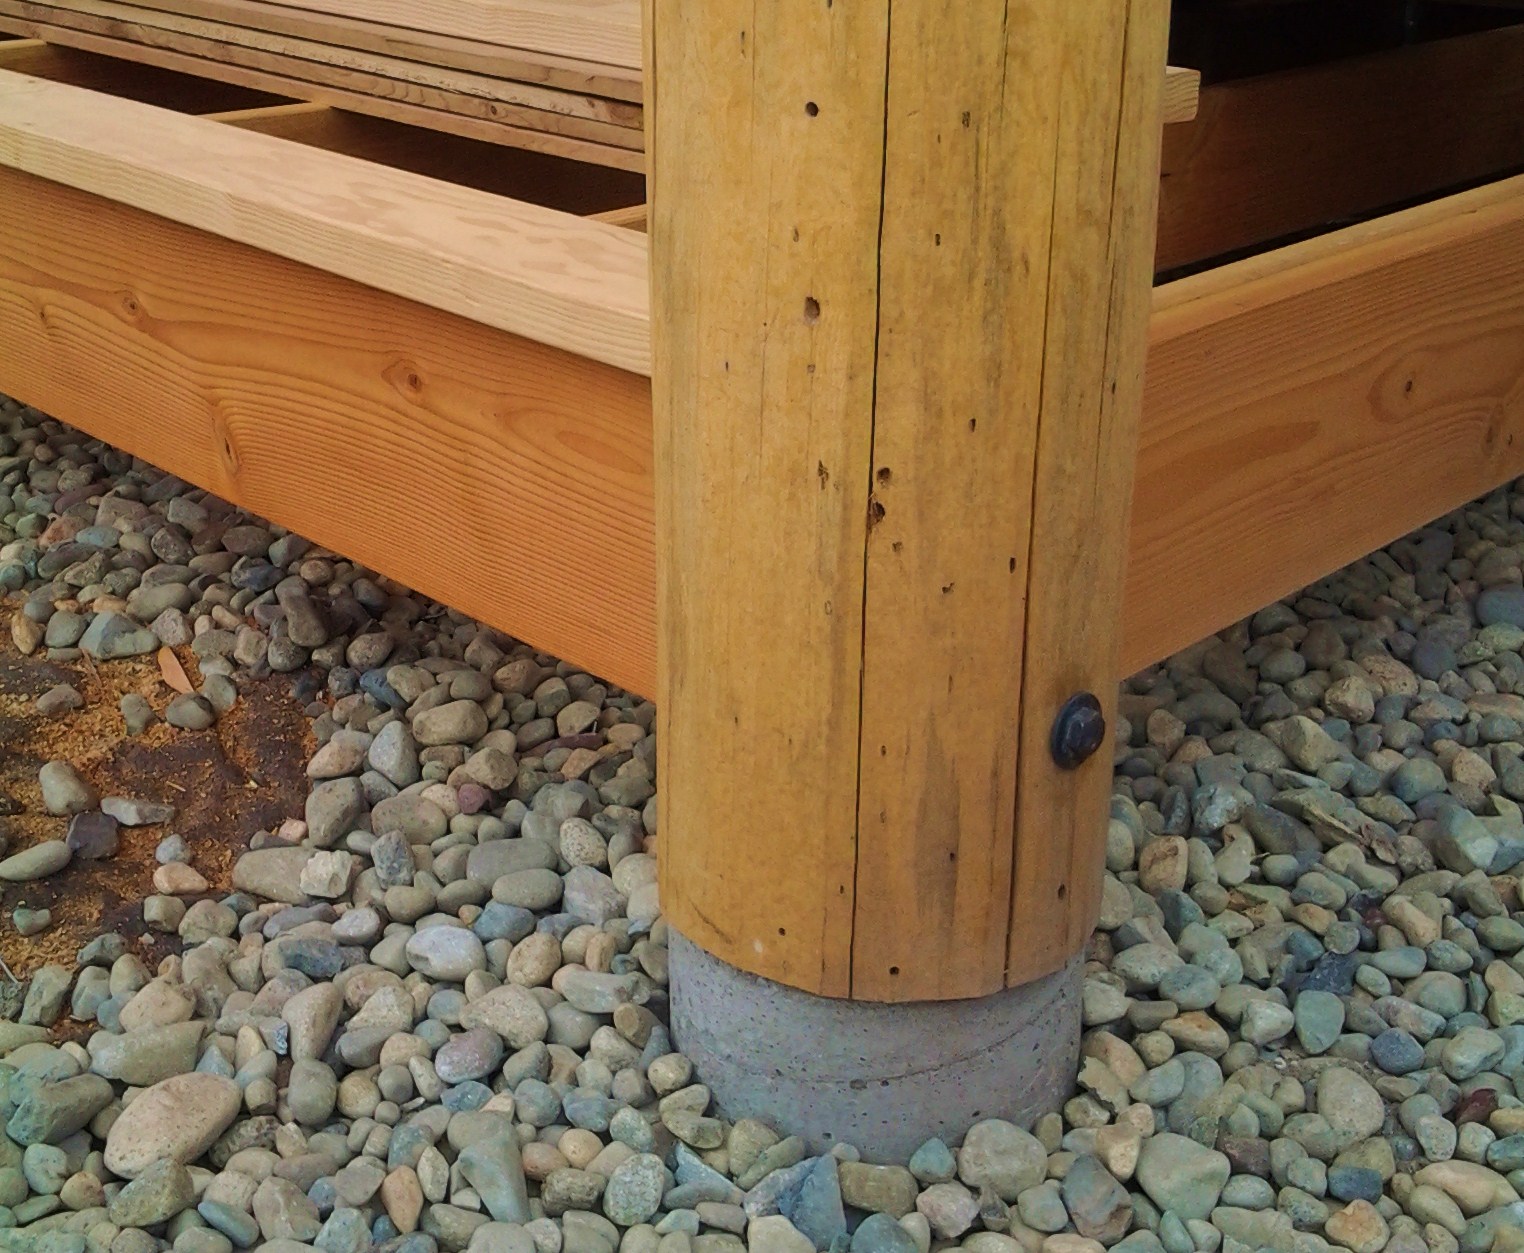
Good design is as much about what you don't see as what you do. In this post I'm talking about hidden fasteners, using mechanical means to secure visual grade construction materials without drawing attention to the sometimes unattractive fasteners themselves. When working with log enhancements (in this case covered porch posts) the last thing your eye wants to see is the bulky metal fasteners typically required to secure the logs to their foundation piers.

10" concrete pier & 'Methow Valley' tiedown
My favorite means to this end is a concrete to wood tiedown that was developed here in the Methow Valley by a long time manager at the local lumber yard. By putting together two  3/4" bolts welded to the bottom of a 6x6 steel plate and an 2"x 8" steel plate welded to the top we have a perfect solution.

Joined to plunge cut 10" log post
 By putting a deep plunge cut into the bottom end of a log post we are able to join post to pier in a simple yet substantial way. The addition of a horizontal 5/8" lag or bolt penetrating the log and vertical steel plate completes the tiedown in an completely unobtrusive manner.

Equals clean, unobtrusive transition
Dipping an off the shelf plated bolt or lag into gun bluing gives a nice blacksmithed appearance to the required fastener without the rust stains from untreated steel or the chipped paint look inherent in a painted fastener.

Finished post
I'll bring you along on the next phase of this covered porch in a future post.

Thursday, June 14, 2012

Time Delayed Thank You

It seems like I'm going to have to fight to keep from having a 'time delay' aspect to this blog. It's been over a month now since our last job finished and we moved full time back into the Tareski/ Mazama cabin. Maybe it's just the aspect of getting up to speed on the whole thing, wanting to kind of fill in the blanks about 'Smarter Than The Wood'. And then there is the split personality of the early part of it's development. Much of the energy in the beginning came from the revitalized shadowlineconstruction.com website.  Going forward, posts that relate more to the original smarter than the wood premise should begin to dominate. I'm looking forward to posts about the recycled wood flooring we'll be using in the "cabin" and the carriage style garage doors Nick and I have been creating over the last 10 years. Maybe a post or two about log posts and different ways to highlight them in a covered porch or even some of the wrought iron details we've been able to incorporate into our projects.

Anyway, I wanted to give a shout out to Jim & Kristi, owners of the beautiful home we recently completed near Winthrop. If all client/owners were as easy to work with as they have been everyone would want in on the action. If you're familiar with the portfolio page on my website, Jim & Kristi's home is the 'work in progress' icon (talk about time delay). I'll be moving them into their own spot soon so that the new Tareski cabin can begin being featured as well.


'another satisfied customer'


So, here's to you, Jim & Kristi. It's been great getting to know you and working with you to create one of the nicest homes in the Valley. Your considered way of allowing the place to evolve and grow to more than it originally was, made for a most positive experience for all of us. Thank you!

Monday, June 11, 2012

“Rock” Stars – Big Bessie part II


Over the past couple of weeks, the singular impact of Bessie and Billie Bob has been transformed by the addition of hundreds of brother and sister stones. The finely completed fireplace is now an even more impressive collaboration of stone.

"The Family Stone"
The quality of stone chosen by Dave “the über mason” and his right hand man Luke has translated into an awe-inspiring work of high-level craftsmanship. There is no “rock jumble” here.

Dave and Bessie, proud papa.
The overall effect is of carefully selected and skillfully set stone with true lines and square corners. The rustic wood mantle harmonizes well with the organic nature of these beautiful river stones. The larger stones at the base anchor the fireplace, while the throat of the chimney tapers nicely as it stretches for the ceiling. Individual “statement” size stones decorate the chimney face as it transitions from mantle to roof.

Built to last
            I can imagine relaxing after dinner, my mind wandering as I watch the faces in the stone reflect back in the firelight.

            Thanks Dave and Luke, you absolutely did justice to this one. Years from now visitors to this mountain valley cabin will surely remark: “They just don’t build them like they used to.”


Thursday, May 17, 2012

Big Bessie

   So this is a big day on the jobsite. We've just started a new river rock fireplace. Not your average cultured stone production, but a made by Mother Nature big rock beauty. And not just a big rock but the biggest rock I've ever seen in a "cabin" fireplace. We talk about stone size by the man, with a one man stone being the norm and a two man stone being the normal limit, used sparingly and generally to make a kind of statement. On this job the owners said "we want some big boys". Our mason, Dave, offered that he had been saving one for his own use but that he would be willing to give it up for this job. Having known Dave for twenty years I was sure it would be something special.


"How are we gonna move this beast"


   Now a stone with this much presence deserves it's own name. We've been using 'Big Bessie' for now but something better may come along. Ideas? It took a forklift to get this bad boy inside the building and four men to roll it across the floor to the point nearest its final location. Here comes the 'Smarter Than' part. Have you ever heard about how the Easter Islanders got their stone monoliths stood up? It's all about leverage and fulcrum.There was no way we were going to be able to stand this baby up from the floor. We needed leverage.


"Everybody got their steel toe'd boots on?"

   We brought in an assortment of framing and beam scraps and with a 2x4 as a pry bar, started to lever it up. First a 2x4 scrap, then another, then a short beam end replacing the first pieces and to provide greater stability. Pry a little, add a block of wood, then pry a litttle more. We kept at this until we reached a kind of tipping point. When the weight of the stone on the floor starts to be greater than the raised end, it should be possible to man handle the stone into place. With five of us, two on each side and with me manning the pry board, then one last lift and push and we made it.

"Yes!"

   Standing back now to admire our work, I am even more impressed with our 'Bessie' knowing what it took to give her such a good home.   More to follow....

Bessie's little brother Billy Bob on the left.