Saturday, July 21, 2012

Not To See, part 2

In my last blog post I tried to show the value of hidden fasteners in the design and construction of a covered porch. I had gotten as far as showing a completed log post base. It might work best to read this previous post first.

   Ever try to plumb a tapered log post? I promise you will find way too many different readings on your level to be confident of plumb perfect. Mother nature says throw away the level and stand back and use your eyeball. If it looks good it probably is. It would be smart to check that the prescribed measurements for the coming roof structure align with this 'good enough' philosophy.

Big wood, big saw
After plumbing up and bracing off our three log posts, we cut, plane and otherwise prepare the horizontal beams before lifting them into position. Once in place they will allow the roof load to transfer through the rafters and onto our posts.
All good posts deserve good beams
With everything we are doing exposed to view, the scale and proportion of the finished product is very important. We use 6x ( in this case 6x10 and 6x12) solid sawn beams for the horizontal support system instead of the adequate but lighter visual impact of a 4x beam or the less friendly, man made reality of engineered wood (glu-lam beam).
Nick setting a mitered corner.
The joinery in this installation may appear simple to the naked eye but is important to the long term presentation of this celebrated area of outdoor living. In this case we use a hybrid miter joint at the  corners where the beams come together at 90 degrees. This modification will minimize the eventual shrinkage to the inner faces of the adjoining beams. I'll plan to do a future post explaining 'shrinkage' of large scale materials but suffice to say that with this approach we will minimize the negative visual aspect of a standard miter joint opening over time.

Big hammer, big lag
Once the beams are in place over their respective posts we can add another element of our hidden fastener approach. Though this may not fly with some building inspectors we are able to use 16" lag bolts driven through each beam bearing location and into the post beneath. The threaded portion of the lag acts as a kind of 'ring shank' fastener as it penetrates the post end grain. Next comes the ridge post and ridge beam, here again we use a 16" lag from above and 8" Timberlock screws at the ridge post base.

Impact driver makes setting long screws 'No Problemo'
For the rafters we again use Timberlock screws to act as tiedowns from above so as to be hidden from view.
Ridge post with diagonals for strength and beauty
Once the rafters are properly secured we can proceed to the function of standard roofing methods as well as the further visual enhancement of the enclosed pine T&G soffits.

Monday, July 9, 2012

To See Or Not To See

Good design is as much about what you don't see as what you do. In this post I'm talking about hidden fasteners, using mechanical means to secure visual grade construction materials without drawing attention to the sometimes unattractive fasteners themselves. When working with log enhancements (in this case covered porch posts) the last thing your eye wants to see is the bulky metal fasteners typically required to secure the logs to their foundation piers.

10" concrete pier & 'Methow Valley' tiedown
My favorite means to this end is a concrete to wood tiedown that was developed here in the Methow Valley by a long time manager at the local lumber yard. By putting together two  3/4" bolts welded to the bottom of a 6x6 steel plate and an 2"x 8" steel plate welded to the top we have a perfect solution.

Joined to plunge cut 10" log post
 By putting a deep plunge cut into the bottom end of a log post we are able to join post to pier in a simple yet substantial way. The addition of a horizontal 5/8" lag or bolt penetrating the log and vertical steel plate completes the tiedown in an completely unobtrusive manner.

Equals clean, unobtrusive transition
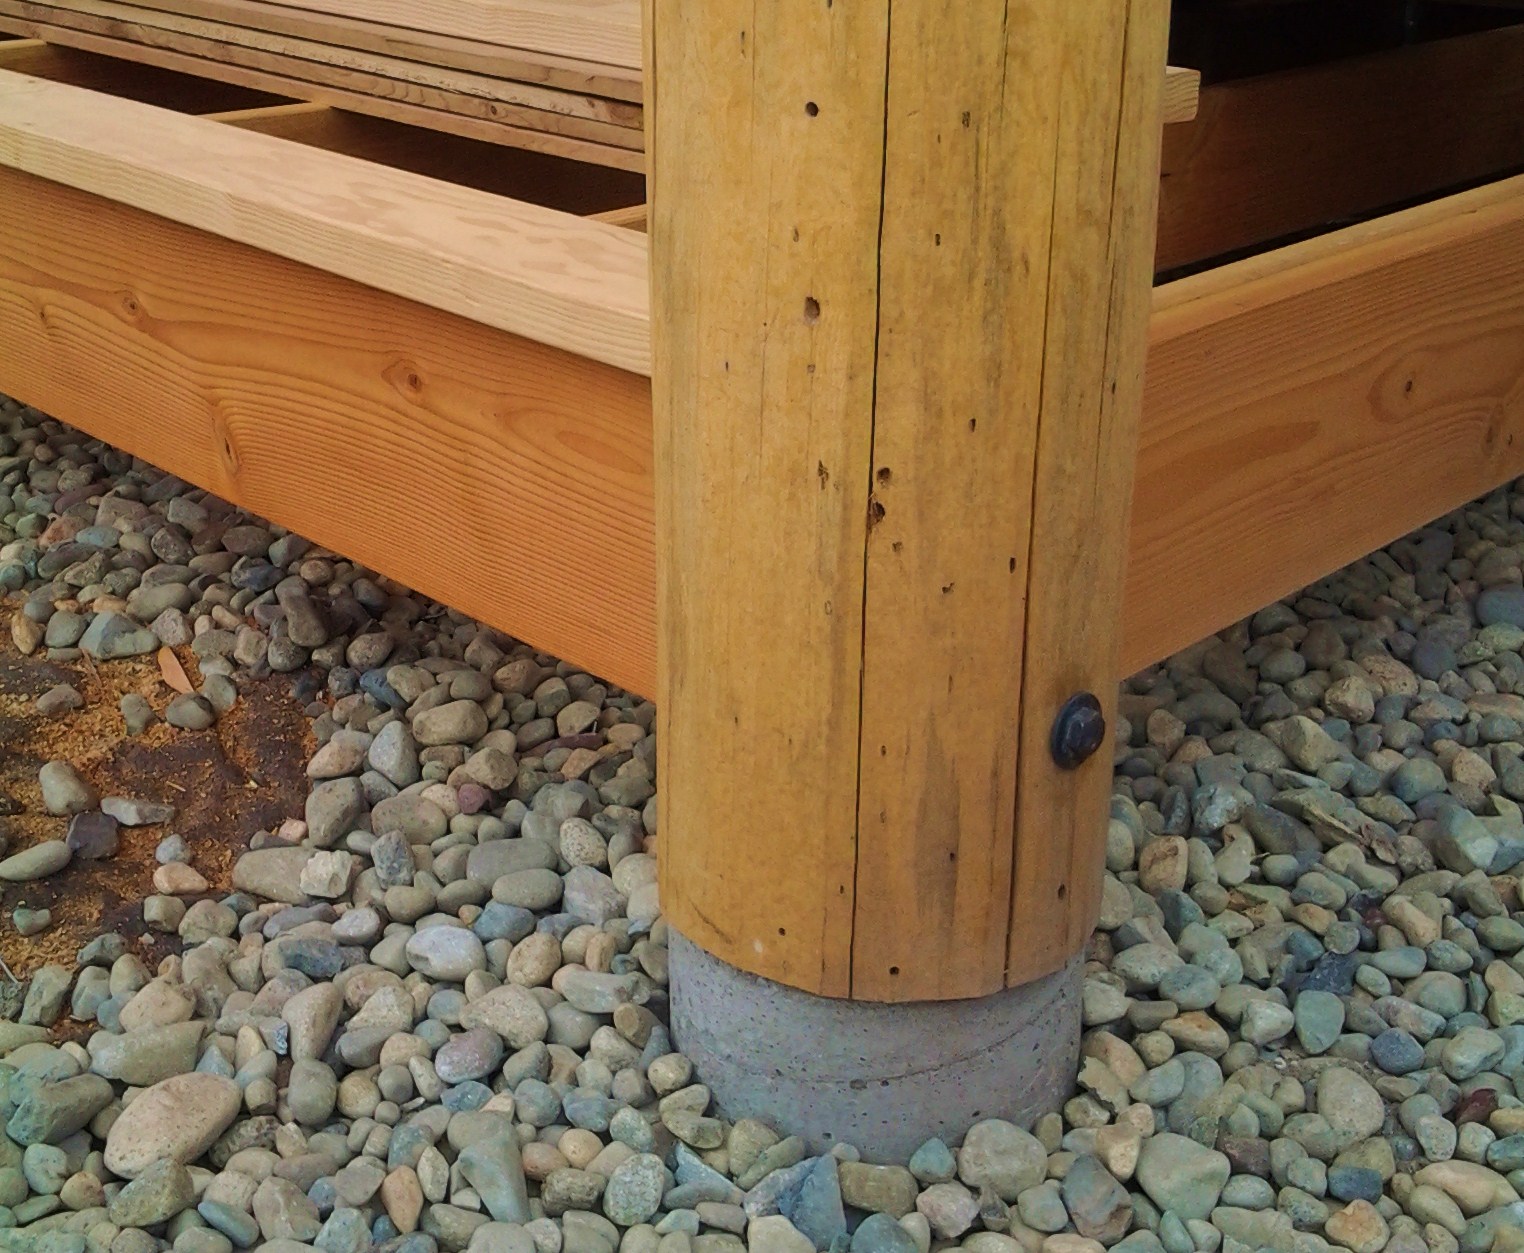
Dipping an off the shelf plated bolt or lag into gun bluing gives a nice blacksmithed appearance to the required fastener without the rust stains from untreated steel or the chipped paint look inherent in a painted fastener.

Finished post
I'll bring you along on the next phase of this covered porch in a future post.

Thursday, June 14, 2012

Time Delayed Thank You

It seems like I'm going to have to fight to keep from having a 'time delay' aspect to this blog. It's been over a month now since our last job finished and we moved full time back into the Tareski/ Mazama cabin. Maybe it's just the aspect of getting up to speed on the whole thing, wanting to kind of fill in the blanks about 'Smarter Than The Wood'. And then there is the split personality of the early part of it's development. Much of the energy in the beginning came from the revitalized shadowlineconstruction.com website.  Going forward, posts that relate more to the original smarter than the wood premise should begin to dominate. I'm looking forward to posts about the recycled wood flooring we'll be using in the "cabin" and the carriage style garage doors Nick and I have been creating over the last 10 years. Maybe a post or two about log posts and different ways to highlight them in a covered porch or even some of the wrought iron details we've been able to incorporate into our projects.

Anyway, I wanted to give a shout out to Jim & Kristi, owners of the beautiful home we recently completed near Winthrop. If all client/owners were as easy to work with as they have been everyone would want in on the action. If you're familiar with the portfolio page on my website, Jim & Kristi's home is the 'work in progress' icon (talk about time delay). I'll be moving them into their own spot soon so that the new Tareski cabin can begin being featured as well.


'another satisfied customer'


So, here's to you, Jim & Kristi. It's been great getting to know you and working with you to create one of the nicest homes in the Valley. Your considered way of allowing the place to evolve and grow to more than it originally was, made for a most positive experience for all of us. Thank you!

Monday, June 11, 2012

“Rock” Stars – Big Bessie part II


Over the past couple of weeks, the singular impact of Bessie and Billie Bob has been transformed by the addition of hundreds of brother and sister stones. The finely completed fireplace is now an even more impressive collaboration of stone.

"The Family Stone"
The quality of stone chosen by Dave “the über mason” and his right hand man Luke has translated into an awe-inspiring work of high-level craftsmanship. There is no “rock jumble” here.

Dave and Bessie, proud papa.
The overall effect is of carefully selected and skillfully set stone with true lines and square corners. The rustic wood mantle harmonizes well with the organic nature of these beautiful river stones. The larger stones at the base anchor the fireplace, while the throat of the chimney tapers nicely as it stretches for the ceiling. Individual “statement” size stones decorate the chimney face as it transitions from mantle to roof.

Built to last
            I can imagine relaxing after dinner, my mind wandering as I watch the faces in the stone reflect back in the firelight.

            Thanks Dave and Luke, you absolutely did justice to this one. Years from now visitors to this mountain valley cabin will surely remark: “They just don’t build them like they used to.”


Thursday, May 17, 2012

Big Bessie

   So this is a big day on the jobsite. We've just started a new river rock fireplace. Not your average cultured stone production, but a made by Mother Nature big rock beauty. And not just a big rock but the biggest rock I've ever seen in a "cabin" fireplace. We talk about stone size by the man, with a one man stone being the norm and a two man stone being the normal limit, used sparingly and generally to make a kind of statement. On this job the owners said "we want some big boys". Our mason, Dave, offered that he had been saving one for his own use but that he would be willing to give it up for this job. Having known Dave for twenty years I was sure it would be something special.


"How are we gonna move this beast"


   Now a stone with this much presence deserves it's own name. We've been using 'Big Bessie' for now but something better may come along. Ideas? It took a forklift to get this bad boy inside the building and four men to roll it across the floor to the point nearest its final location. Here comes the 'Smarter Than' part. Have you ever heard about how the Easter Islanders got their stone monoliths stood up? It's all about leverage and fulcrum.There was no way we were going to be able to stand this baby up from the floor. We needed leverage.


"Everybody got their steel toe'd boots on?"

   We brought in an assortment of framing and beam scraps and with a 2x4 as a pry bar, started to lever it up. First a 2x4 scrap, then another, then a short beam end replacing the first pieces and to provide greater stability. Pry a little, add a block of wood, then pry a litttle more. We kept at this until we reached a kind of tipping point. When the weight of the stone on the floor starts to be greater than the raised end, it should be possible to man handle the stone into place. With five of us, two on each side and with me manning the pry board, then one last lift and push and we made it.

"Yes!"

   Standing back now to admire our work, I am even more impressed with our 'Bessie' knowing what it took to give her such a good home.   More to follow....

Bessie's little brother Billy Bob on the left.


Tuesday, May 15, 2012

The new Shadowline Construction website is up and running and all the people standing in line to read my prose must be satisfied!

So, let's get this thing started...

    The other day I received an email from a client who's "cabin" (we call all the homes we build cabins, no matter the size; it's kind of a standing joke) is mid way through construction. We'd had a meeting on site the day before to go over the progress made to date and to talk about any issues going forward that needed to be resolved in the next couple of weeks. In the email the client said she just wanted to thank me for "having so much personal ownership" in their project. I don't think I have had a client say that in quite that way before, but it's perfect. For years I've tried to verbalize how the relationship between client and builder (or designer/builder) should develop. For me, a successful project ends with a home that not only reflects the owners, but that I love as well. That "personal ownership" is the glue that makes this process work.
    I know it's a possibility that this objective will be taken in the wrong light. This isn't MY home we're building, so why should I take possession of it? The truth is that after a year of planning and construction, I'm typically deep into this thing that we are creating together, and that reality is a strong, positive force for the evolution of our creation.
    In the beginning there are just mental sketches of an idea, a feeling the owner wants to express. Working together we define a physical reality based in concrete, lumber and metal. Ideas that start in the ether come to earth as covered porches that protect, as entryways that draw you in, and as features that inspire.
    By the end of the process, we hope to have a home that is truly a custom representation of the proud owners' desires and needs. And for my crew and I, a home that gives us a sense of pride, a desire to get up in the morning because our work has value, and maybe, on a good day, a chance to experience that "smarter than the wood" moment, when because of our commitment, a simple detail becomes more than itself.

Sunday, March 11, 2012

So the old carpenter says to the new guy....

 ... you've just got to be smarter than the wood.

   What am I trying to get at here? Is 'smarter than the wood' a joke? Sometimes.
Is it meant to be thought provoking? Totally.

   Mostly it's about problem solving with a sense of humor. See a problem. Find a solution. Nothing is more satisfying than pushing through a challenging situation, a mistake if you will, and ending up with a creative solution. Maybe even improving on whatever was expected in the beginning.

  The goal of this blog will be to walk a line between inside information, most useful to other carpenter types, and the hopefully just plain interesting stuff accessable to all us who see life as a satisfying challenge. Readers will be anyone from current clients looking for updates on their "cabin" in progress to builders from other geographic areas, interested in how others have dealt with problem solving situations. And maybe, even especially, folks just curious about how 'a day in the life' of a design/build team might play out.

   Having never done anything like this before I don't really have a clue where it will end up but I am looking forward to the trip. Hopefully, over time, we can draw other like minded people in, helping to refine and redirect where to go next. Wish me luck, Don